09 10 expr:class='"loading" + data:blog.mobileClass'>

Search This Blog

Wednesday, December 19, 2018

Fun and Easy Rustic Holiday Decor!

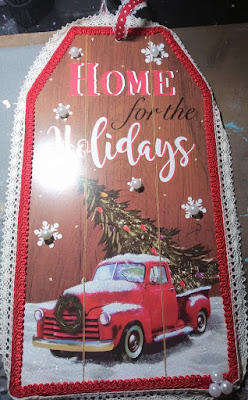
Happy Holidays everyone, I am here today to share a fun and cost effective holiday decor piece.  I went to the Dollar Tree recently and found these super cute signs and just had to alter them with some products from ScraPerfect.  The rustic country trend is following us into holiday decor this year and I for one am happy about that!  Hope you like what I created:


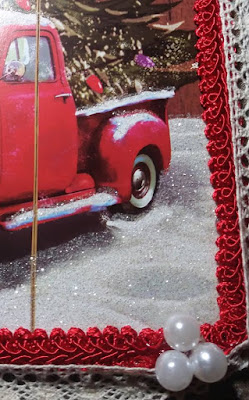
I began by pulling some potential goodies from my stash to add to my sign and then got out the Best Glue Ever since I knew it would adhere anything I needed to the wood sign.  Red Chinese braided trim was added all around the perimeter of the sign.  Makes it pop, don't you agree?  Then I began applying tiny dots of the Best Glue Ever for some embellishments. When using the Best Glue Ever, you should really have a 
No Clog Writing Cap on the bottle for additional precision and to make your bottle last longer.


I chose some pearls, so I grabbed my Embellie Gellie to insure perfect placement in the center of the snowflakes.  There is no other way to do this without turning your hands into a sticky mess.  This is a must have for any crafter that works with tiny elements in their art.


As you can see, I also added a trio of pearls on the center where the two edges of trim meet.  Ivory crocheted lace was also applied to the perimeter of the sign with the Best Glue Ever for added interest.
I really liked that this sign already had sparkle so I didn't have to add any.  These signs add cheer to any home during the holiday season and would make great gifts as well!  Once my project was complete,
 I squirted some Best Cleaner Ever on my hands and rubbed them with the Perfect Cleaning Cloth and my hands were spotless in two minutes.  Here is a look at my finished altered holiday sign:


I hope you like my quick and easy home decor piece and will come back in the New Year to see what I make then.  Kindly follow the blog, order your supplies today, check out all social media, and come back for updates and inspiration from ScraPerfect!  I would really appreciate it if you would follow this blog and leave me a comment, thanks again!

Holiday Blessings,

Kim Lippincott

Friday, October 12, 2018

Welcome to My Blog!

Hello and Welcome!  I am Kim Lippincott and am excited to tell you about this blog. I have been and Artist Crafter for 25 years and started out by creating scrapbooks for my children. From there, I moved on to card making in all it's various forms. I began swapping immediately and still do.

I have previous experience as a Store Owner for the Vintage Rose Emporium, Design Team Leader for Creating With Details, and Designed for: Etchall, Archana Joshi's Creative Card Challenge Blog, Angela Holt Designs, Creating With Details, and ScraPerfect.com.Etchall

I have served as a Guest Designer for Shabby is Chic Boutique, and for ScraPerfect.  I am currently on the ScraPerfect team.  I have returned to art journaling and planning and love them both dearly.

My Crafty aspiration is simple, to give back. I would love to be on a team with an outreach program or pay it forward program.  I will gladly blog and vlog for any team that does this.  I currently go live on a friend's channel weekly.  I am aware of how precious resources are and as such; love to upcycle anything and everything...especially craft supplies!  I continue to support many friends and always will.  A sense of community is essential for me.  I appreciate you all taking the time to read  this and would appreciate it if you would follow my blog.

Crafty Hugs,

Kim Lippincott

Tuesday, September 18, 2018

Creating Artist Trading Coins with ScraPerfect is Easy and Fun!

 Fun with ScraPerfect!


Hello crafters, Kim Lippincott here with a super fun and inexpensive project...
Artist Trading Coins!  I love making these, because I only used paper from
 my scrap bin. I hope you will try some too and share them with your friends. 
 They are traded just like atc's are, so you can swap them quickly in groups
 with a minimal amount of postage.  
Here are some of my Artist Trading Coins:


Image may contain: food

1. Use your circle punch from your stash and punch out lots and lots of circles.
Then use the Best Glue Ever to adhere them to another circle for sturdiness.
Give your circles a quick tap before gluing with the
 https://scraperfect.com/product/perfect-crafting-pouch/

2. Now comes the fun part...start embellishing your coins!
 I used https://scraperfect.com/product/embellie-gellie/
since it can grab anything you can think of quickly and is a multi purpose tool.
 Use the bottom of the stick to tap your embellishments to hold them.

No automatic alt text available.

3. Some examples of items you can use to decorate your ATC's with are:
resins,stickers lace, ribbon, doilies, buttons, string, burlap, stones, stamps,
 micro beads, shavings, etc.
 This is the most challenging part of the process for me since I had too
 many choices!

No automatic alt text available.

4. Helpful Hints:  I should mention that Artist Trading Coins are meant to be
 flat for easy mailing, but I made lots of mine chunky!  I would also recommend 
using washable markers and not sharpies since they leave marks everywhere.  https://scraperfect.com/product/best-cleaner-ever/ is what to use after 
you finishthis project...it takes away the mess and your hands are ready
 to create again in a jiffy!

5. Thank you so much for looking at my Artist Trading Coins!
Don't forget to use the entire
family of products from ScraPerfect!

Until Next Time,

Kim Lippincott

Image may contain: 1 person, smiling, closeup