09 10 expr:class='"loading" + data:blog.mobileClass'>

Search This Blog

Showing posts with label Home Decor. Show all posts

Saturday, March 9, 2019

Hippity Hoppity Easter's On It's Way!

Hello everyone, I am. here today for ScraPerfect to share a home decor project that is great for Easter or Spring.  I love home decorating for the holiday and found a frame on clearance to alter and I love the way it turned out, thanks to the amazing products from ScraPerfect.  Here is what I created, I hope you like it:


To begin. I measured and cut the cream crochet ribbon and ivory sequin trim and set them aside.  Then I applied small dots of the Best Glue Ever along the turret on the perimeter of my mint green photo frame.  I applied the crochet ribbon while applying gentle pressure and repeated the process with the sequin trim.  I took the back of my frame off  and attached ivory organza to the inside with the Best Glue Ever.  I made medium sized glue dots  from the Best Glue Ever and used them to secure the tea dyed doily to the organza.  This was also done with the rusty overalls, which I swiped with a beige ink pad to give a distressed feel. Whenever I am working with the Best Glue Ever, I keep a small No Clog Writing Cap on my bottle for precision and to reduce the amount used since a little goes a long way!


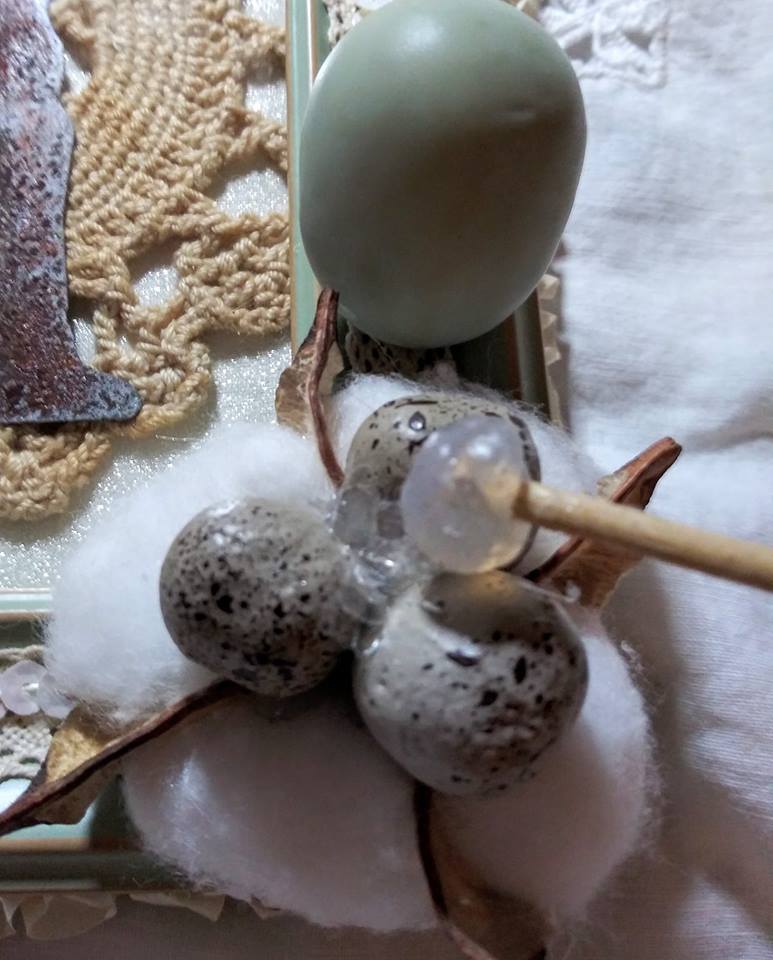
Now it is time to embellish my project.  I used the Best Glue Ever to attach the mint green metal clip to my frame.  It holds my hanging rabbit resin embellishment that I also added a small ivory gross grain bow to.  On the opposite corner, I used  large glue dots of the Best Glue Ever to secure the white cotton bud and small grey speckled eggs on top to my project.  I also attached the large green egg this way.  Then I got out my Embellie Gellie to add some mica flakes in the middle of my small egg trio, as well as on the clip on the top of my frame.


Thank you all for stopping by today to check out my home decor piece, I had fun making it and can't wait to display it for Easter.  Please be sure to follow ScraPerfect on social media and stop by the store website to purchase your supplies too, you won't be sorry!  If you would like to see more of my work, you can subscribe to my blog, Vintage Rose Creations by Kim.

Until Next Time,

Kim Lippincott

Wednesday, December 19, 2018

Fun and Easy Rustic Holiday Decor!

Happy Holidays everyone, I am here today to share a fun and cost effective holiday decor piece.  I went to the Dollar Tree recently and found these super cute signs and just had to alter them with some products from ScraPerfect.  The rustic country trend is following us into holiday decor this year and I for one am happy about that!  Hope you like what I created:


I began by pulling some potential goodies from my stash to add to my sign and then got out the Best Glue Ever since I knew it would adhere anything I needed to the wood sign.  Red Chinese braided trim was added all around the perimeter of the sign.  Makes it pop, don't you agree?  Then I began applying tiny dots of the Best Glue Ever for some embellishments. When using the Best Glue Ever, you should really have a 
No Clog Writing Cap on the bottle for additional precision and to make your bottle last longer.


I chose some pearls, so I grabbed my Embellie Gellie to insure perfect placement in the center of the snowflakes.  There is no other way to do this without turning your hands into a sticky mess.  This is a must have for any crafter that works with tiny elements in their art.


As you can see, I also added a trio of pearls on the center where the two edges of trim meet.  Ivory crocheted lace was also applied to the perimeter of the sign with the Best Glue Ever for added interest.
I really liked that this sign already had sparkle so I didn't have to add any.  These signs add cheer to any home during the holiday season and would make great gifts as well!  Once my project was complete,
 I squirted some Best Cleaner Ever on my hands and rubbed them with the Perfect Cleaning Cloth and my hands were spotless in two minutes.  Here is a look at my finished altered holiday sign:


I hope you like my quick and easy home decor piece and will come back in the New Year to see what I make then.  Kindly follow the blog, order your supplies today, check out all social media, and come back for updates and inspiration from ScraPerfect!  I would really appreciate it if you would follow this blog and leave me a comment, thanks again!

Holiday Blessings,

Kim Lippincott

Thursday, November 9, 2017

Fun Fall Altered Canvas

Hi there! Today I am sharing a Fall project with you.  Have you ever started a project and lost inspiration and set it aside?  I had one of those from last Fall that I was determined to finish.  Here is how it turned out, thanks to my ScraPerfect products:


Here is what I started with, a canvas that I made a background on with water color pencils and a water brush, that sat for a year.


I jazzed it up a bit with some metallic copper ink and Distress Crayons, then got out my cutting machine and the Best Glue Ever and got inspired.  I cut out a Fall design and used the Best Glue Ever with the No Clog Writing Cap on and glued each word or letter on with small dots of glue.


I still wasn't happy with it because it was one dimensional, so I got out some embellishments and went to town. I used the Best Glue Ever to highlight some elements of the design by adding glitter and micro beads.


I placed the brown button with the help of Embellie Gellie.  I don't fiddle with small items anymore since I started using this over a year ago, I love it!


I also used the Best Glue Ever to adhere some orange roses coated with copper glitter to the canvas.  I cut some multi colored leaves out from both plain and textured card stock and coated them with micro beads for interest too.  I put foam squares on the back of the card stock leaves to make them pop.  I recycled the  leaves from the roses and attached them to my canvas with the Best Glue Ever.


For more embellishment , I used the Best Glue Ever to glue some brown braided trim around the outside of the entire canvas.  It looked more finished to me with it. Because I like bling, I also attached some beaded trim to hang down from the bottom.


My final touch was to add a loose bow to the top corner, made from a brown nylon material.
I applied some of the Best Glue Ever, waited for it to set clear, then held my bow in place for a minute until it bonded to the canvas.


I noticed at this point, that some glitter and micro beads had clung to my canvas where I didn't want them.  In hindsight, i should have wiped the canvas with the Perfect Crafting Pouch before getting the glitter out.  Well,everything can be fixed, so I tried the technique after the fact and it still worked great!  I will be leaving mine on my craft desk from now on so I don't have to learn this lesson again the hard way.


At this point, I was finally happy with the end product, hope you like it too!


Please subscribe to this blog, leave me a comment, and check out all of the wonderful products at 
ScraPerfect.  Thanks for stopping by!

Happy Fall,

Kim Lippincott


Sunday, October 22, 2017

Foiling For Fall With ScraPerfect

Hi there!  Kim here today to share a Fall home decor project.  Fall is my favorite season, but doesn't really exist in Florida so I decorate like it does!  I found this grapevine wreath with chicken wire at my local craft store for only $2!  Now I just have to wait for Halloween to be over so I can hang it up.
ScraPerfect made this project quick and easy!  Hope you like my Fall creation:


I started out by wrapping a white pip berry garland around the wreath. Using my Silhouette Curio, I cut out the leaves and words out of colored card stock. I repainted the pumpkin because it was gold when it was given to me.  After the paint dried, I added some Tim Holz distress glitter in rust and swiped the pumpkin lines with white ink. I handmade a bow with a gauzy ribbon and adhered that to the wreath.  Then I attached the leaves, then the pumpkin, and finally more pip berry garland.
As you can see, the pumpkin is embellished by mulberry roses in cream, orange, and brown. The orange roses have also been given a coat of glitter.  Here's a closer look:


For the  greeting, I foiled the card stock letters in orange and then attached them to pieces of the gauze ribbon  to make it easier to adhere them to the wreath. I added some of the glittered roses around the letters for embellishment there also.  Here is a closer look at that:


I have to say that the star of this project is the Best Glue Ever!  I did have to use large glue dots to adhere the pumpkin because of it's weight, but it is stuck on there very well.  I used varying sizes of glue dots on everything, depending on size and weight.  I allow my glue dots to dry a few minutes until clear to place item.  Here is a full list of the ScraPerfect products I used for this wreath:

No Clog Writing Cap ( for the top of the BGE bottle for precision)
Best Cleaner Ever (for clean hands)

And here is a last, closer look at my Fall decor wreath, thanks so much for stopping by!  Please check back, subscribe to this blog, and leave me a comment.


Happy Fall Y'all,
Kim