09 10 expr:class='"loading" + data:blog.mobileClass'>

Search This Blog

Showing posts with label lace. Show all posts

Thursday, April 18, 2019

Junk Journal Kits For Sale!


Hi there!  Today I am sharing some great junk journal kits that I have for sale.  They are chock full of fabulous goodies to make a junk journal.  All you need is a cover and some adhesive and you are ready to create!  Here are some photos of the kit I am offering for $20 plus shipping:


This is the complete kit, now let's take a closer look at what is in the kit.  Here are the papers:


You will get hand dyed paper sheets, music paper, book paper, map pieces, receipts, tags, and bags, tabs, playing cards, and dyed coffee filters, tickets.  Here are the fibers:


These will be great for Boho beads or to wrap around paper pieces for embellishments.  Included is a ivory thread and a vintage thread for you to bind your journal with.  Now check out all of these extras:


The extras include a yard of vintage black velvet ribbon, a yard of white lace, wooden buttons, safety pins, charms, beads, paper clips,brads,  a tassel and yoyo, and some ephemera.

I do ship internationally and I do combine shipping.  I accept payment via Paypal.  If you would like to order a kit (there are 5 available), you can comment here.  You may also order through my Facebook store page, which is, Vintage Rose Creations.  That is also where you can see my full inventory. Thanks for stopping by today, please subscribe so you don't miss anything and come back soon!

Crafty Blessings,

Kim


Saturday, March 9, 2019

Hippity Hoppity Easter's On It's Way!

Hello everyone, I am. here today for ScraPerfect to share a home decor project that is great for Easter or Spring.  I love home decorating for the holiday and found a frame on clearance to alter and I love the way it turned out, thanks to the amazing products from ScraPerfect.  Here is what I created, I hope you like it:


To begin. I measured and cut the cream crochet ribbon and ivory sequin trim and set them aside.  Then I applied small dots of the Best Glue Ever along the turret on the perimeter of my mint green photo frame.  I applied the crochet ribbon while applying gentle pressure and repeated the process with the sequin trim.  I took the back of my frame off  and attached ivory organza to the inside with the Best Glue Ever.  I made medium sized glue dots  from the Best Glue Ever and used them to secure the tea dyed doily to the organza.  This was also done with the rusty overalls, which I swiped with a beige ink pad to give a distressed feel. Whenever I am working with the Best Glue Ever, I keep a small No Clog Writing Cap on my bottle for precision and to reduce the amount used since a little goes a long way!


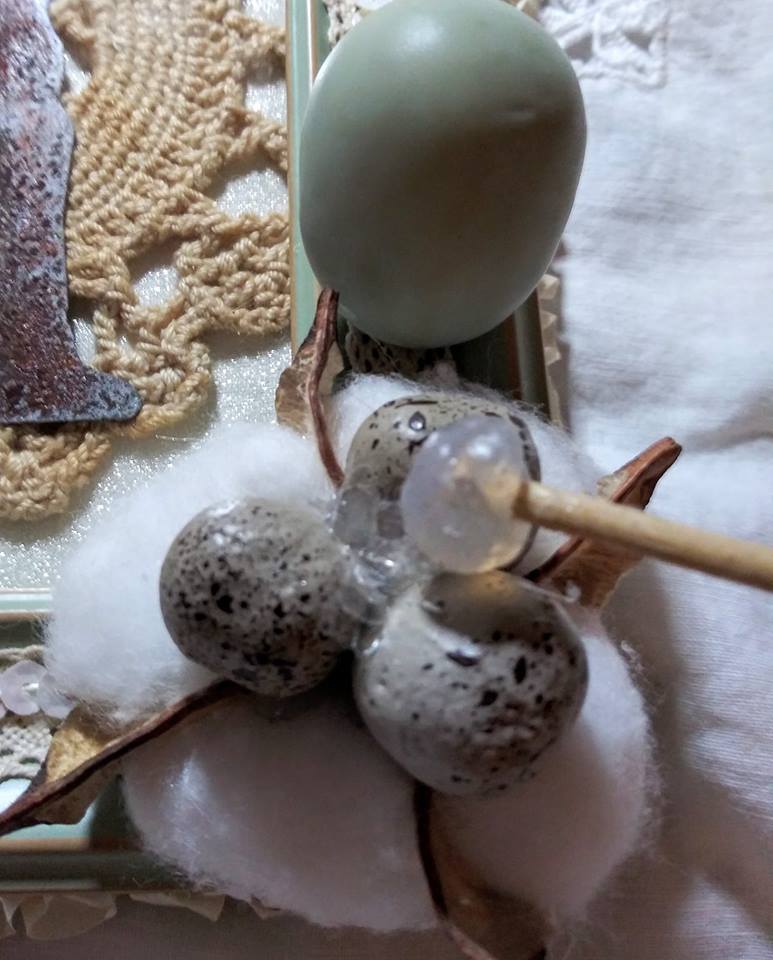
Now it is time to embellish my project.  I used the Best Glue Ever to attach the mint green metal clip to my frame.  It holds my hanging rabbit resin embellishment that I also added a small ivory gross grain bow to.  On the opposite corner, I used  large glue dots of the Best Glue Ever to secure the white cotton bud and small grey speckled eggs on top to my project.  I also attached the large green egg this way.  Then I got out my Embellie Gellie to add some mica flakes in the middle of my small egg trio, as well as on the clip on the top of my frame.


Thank you all for stopping by today to check out my home decor piece, I had fun making it and can't wait to display it for Easter.  Please be sure to follow ScraPerfect on social media and stop by the store website to purchase your supplies too, you won't be sorry!  If you would like to see more of my work, you can subscribe to my blog, Vintage Rose Creations by Kim.

Until Next Time,

Kim Lippincott

Friday, October 20, 2017

Shabby Pink Ballerina Gift Box

Hi there!  I am  here today to share with you another upcycle using the fabulous products from ScraPerfect.  I have so many of these boxes from a monthly subscription and I don't want to waste them.  I decided to upcycle them and use them instead of gift bags.  Hope you like my project:


I began by decoupaging some paper from Scrapberry onto the box using my favorite type of Mod Podge...sparkle! I love the effect the glitter gives on feminine and shabby chic themed projects!


To provide some detail on the sides of the top of the box I adhered ivory flatback pearls and pink pom pom trim with the Best Glue Ever.  To keep my bottle in good working condition, I recommend using the No Clog Writing Cap.  It prevents clogging and protects the tip to ensure your ability to use a thin line of glue.  


This ballerina has been in my stash for ages, so I just had to add it to this project.  Her tutu was blue, so I just added pink stickles to it.  I also added a tiny rhinestone to her tiara with a tiny dot of the Best Glue Ever.  I placed the rhinestone with Embellie Gellie, the quick pick up tool.  The ballerina is surrounded by pink resin roses, which were also adhered to the box with glue dots made from the Best Glue Ever.


For the tails that hang down off of the box, I raided my snippets basket for some small pieces of lace, then added pink and white seam binding and a pink tassel.  Each piece was secured to the top of the box with glue dots made from the Best Glue Ever.  I find that the glue dots work better with heavier items like lace and can be made the exact size needed.


Finally, I attached some ivory flatback pearls all the way around the bottom of the box with a thin line of the
Best Glue Ever for added interest. You can also see that I went around the lip of the lid with a white organza trim and a pink pom pom trim from my stash.  These were light enough that I could use 2 thin lines of the
Best Glue Ever to secure them.  As always, when I finish a project, I use of couple of squirts of the
Best Cleaner Ever on my hands as it is non-toxic and I am good to go!

I hope this upcycle inspires you to try one.  I think anyone would love to get a gift in a decorated box that can be used later for storage.  So get some of the extra boxes you have and the products I mentioned above from ScraPerfect and get crafty.

Thanks for stopping by today, please leave a comment and be sure to subscribe to this blog.  I will be back with another creation tomorrow, so please check back.


Kim 


Monday, May 22, 2017

Using Lace and Tea to Give Your Layouts a Warm Vintage Feel

Hello everyone, I am here today to share my latest project for ScraPerfect with you.  This one was a challenge given to me by DT Penny...she asked me to create a shabby chic scrapbook layout, something I've never done.  I decided to use a precious old photograph that I found of my Grandparents, so it ended up more vintage themed and I love the way it turned out!


This project required some important prep work in order to achieve the vintage feel.  I selected a doily, seam binding, and some laces and tea dyed them, rinsed, and let them dry before using them on this page.
I also gave the blank page a subtle spritz of an antique gold spray.  Then I got out the Best Glue Ever and started layering and attaching the laces to the page.  I made a header with some tea dyed lace mesh, a chipboard word that I covered with Rusty Paper and a layered handmade flower.  For all of this, I made glue dots in various sizes with the Best Glue Ever (depending on the weight of the lace), let them dry for a few minutes and then used them to secure the lace to the paper.


Here is a close up of the handmade flower I created using tea dyed lace, tulle, seam binding, a crocheted doily, and a bling center for sparkle.


The center of my layout is devoted to this amazing photo I found of my Grandparents holding my Uncle when he was a baby.  The pure joy radiating off of their faces touched me heart.  To embellish the photo I used Best Glue Ever to attach small loose rhinestones to my Grandmother's hat and coat.  Of course I used my Embellie Gellie for quick and easy placement.


I intend to hang this page up in my craft room, so wanted some lace to dangle off the page for interest.  For the bottom of the page, I used more of the Best Glue Ever to adhere some tea dyed dangle lace layered under some gorgeous beaded bridal trim.  I also added a lace bow and some flat back pearl trim from my stash.  To finish off the page, I gave it a few more spritzes of the antique gold spray for some subtle shimmer.


I really feel like I honored this cherished photo and hope you like my layout too!


Please be sure to leave me a comment and check out the entire line of amazing products at ScraPerfect.  Stop by this blog everyday to see more creative projects by the rest of this talented team too.   Looking forward to sharing more projects with you again soon.

Crafty Blessings,
Kim

Tuesday, May 9, 2017

Special Shabby Series- Altered Plate #2 "Blue China"

Hi everyone, I am here today to share with you the second altered paper mache plate of my series.  This one is shabby chic too, but incorporates a different color palette.  The inspiration for this project is my beloved Grandmother's antique dishes.  I will be displaying it proudly in her honor, I hope you like it.


I started by decoupaging the napkin onto the paper mache plate.  I then brushed some crackle medium over the entire plate and waited for 24 hours for it to cure.  This was to give it a bit of an antique feel.  Then I got out my Best Glue Ever and went to town!  First, I put glue dots on the back of the satin rose applique and waited until the glue was clear to attach it to the plate. I used the Best Glue Ever the same way to adhere the blue gimp trim around the plate, the white bow lace trim, and the sheer organdy trim around the outer edge.
I used a large dot of the Best Glue Ever in the center of the plate and when clear attached the blue acrylic flowers to the plate.  I used the same method to attach the large pearl flower.


Now I got out the pest pick up tool in the world, Embellie Gellie, and using the tiniest of glue gots, attached the micro pearls to the bow centers of the lace.  As always, when cleaning up, I used a few spritzes of the
Best Cleaner Ever on the Perfect Cleaning Cloth to get my hands clean in a flash.


I hope you are enjoying this series, I have one more plate to share with you soon and this one will have a hook on the back to hang on the wall.  Thank you for stopping by today and please leave a comment.  Be sure to check out the amazing products I've mentioned and the rest of the family at ScraPerfect.  If you would like to see more of my work, check out my blog Vintage Rose Creations by Kim.  Again, here is a look at the final project, enjoy!


Until Next Time,

Kim 

Tuesday, October 18, 2016

Spooky Cute Altered Altoid Tin for ScraPerfect

Hello everyone!  Halloween is approaching and I was inspired by my friend Michelle Wells, who taught a class on altering Altoid tins, so I gave it a try with some ScraPerfect products,  Check it out!


I could not have completed this project without The Best Glue Ever!  It provided the perfect hold to attach everything to the metal Altoid tin.  I removed the lid of the tin and then covered it with two coats of black gesso.  I used The Best Glue Ever to glue the paper to the inside of the tin and glue dots to attach the ribbon around the edges.  For dimension, I added some foam tape to the back of the gold photo embellishment.  


On top of the tin, I used The Best Glue Ever again to glue the embellishments to the black rose from The Vintage Rose Emporium.  I made some larger glue dots and used them to affix the rose to the tin. For the bottom, I mounted the tin on a wooden knob that I painted orange and then covered with black lace. A dollop of The Best Glue Ever and light pressure for a few minutes to set worked like a charm to attach the finished tin to the base.  Finally, to remove any excess glue on the project and my hands, I used a small amount of The Best Cleaner Ever on the Perfect Cleaning Cloth.  The cleaner is amazing and I love that it is eco-friendly!


Thanks so much for stopping by to see my spooky cute altered Altoid tin, please leave me a comment.  You can see more of my work on my blog Vintage Rose Creations by Kim
Be sure to check out all of the fabulous ScraPerfect products at ScraPerfect!
 ScraPerfect products used on this project:


Until Next Time,
Kim


Tuesday, January 20, 2015

Creative Colors Challenge #28

Hi bloggers and crafty friends!  Today I am sharing my latest card done for the Creative Colors Challenge.  As always, we would love for you to play along with us, you can check it out here:

Creative Colors Challenge

Here is the inspiration photo for this challenge:

 We had to use Pink + Green + Pattern Paper + Laces
Our sponsor for this challenge is May Arts Ribbon, they have gorgeous ribbons and laces!


Here is what I created for this one:


The pink cotton lace ribbon, green lace, and pink ribbon in the bow are all from May Arts and are even prettier in person!  The pink flowers are from Secret Garden, the paper is Primrose from Bo Bunny, the Color Fragments are from Stampendous, and everything else is from my personal stash.  I hope you like it!  I intended for this to be a card to celebrate the birth of a baby girl and just love these colors together.  Thanks for much for stopping by, please leave me a comment and come back again soon!

Your Creative Colors Challenge Designer,
Kim

Tuesday, December 16, 2014

Creative Colors Challenge #26

Hi bloggers and crafty friends!  I am coming to you today to share my latest card for the Creative Colors Card Challenge.  We would love for you to play along with us, here is where to find it:
Creative Colors Challenge

As this challenge is the last for the year, our palette consists of holiday colors.  We had to use vintage green, deep red, white, and add glitter.  Here is the inspiration photo for our color palette:


Our sponsor for this challenge is DRS Designs and I picked a very pretty digi of a berry wreath.


Here is my card:


I layered printed card stock from The Paper Studio, 2 of the same Sissix die, white paper doilies, and then  two of the images from DRS Designs.  One was adhered directly to the card and the second was put on top of it with foam tape for dimension.  I colored some of the berries deep red and then added red stickles from my personal stash on top of them.  I used glossy accents on some of the berries and used Barbara Trombley's Ultra Fine Glitter #26 Angel Dust on top of those.  I added 2 small pieces of white lace in the corners and added white resin snowflakes on top of them. I glued white braided trim around all four corners and sprayed that with Tattered Angels Caper Green Glimmer Mist.  I made the bow with hunter green gross grain ribbon, a piece of lace that I sprayed with Tattered Angels Chalkboard Medallion, some ivory seam binding that was also sprayed, and a twig with white berries. I added 2 red buttons and three pieces of snowflake rhinestone and pearl bling to the underside of the bow.  The flowers are from the Secret Garden and were white, I painted them with Radiant Pearls Crimson Nights, added glitter when they were wet.  When dry, I sprayed them with Tattered Angels Barn Red Glimmer Mist.

I hope you enjoy my creation, please feel free to leave me a comment.  I want to wish everyone a Happy Holiday Season!  Thank you all for the support you have shown me, and I look forward to sharing more with you from the Creative Colors Challenge in January!

Your CCC Designer,
Kim Norman

Friday, November 28, 2014

Creating With Details Design Team Project- Altered Configuration Box

Hi bloggers and crafty friends!  Today I want to share with you my first design team project for Creating With Details.  I altered a Tim Holz configuration box that I will be using to hold many of my small embellishments.
I had such a good time playing with all of the CWD goodies, I LOVE this store! 

Creating With Details Store
Here is a photo of my project:

Here is the side view:  as you can see, I attached the feet to the bottom so it will stand up off my messy desk.


This is how it looks when opened up:


I decorated some of the small boxes inside and used others to hold my pearls and some buttons.  These smaller boxes can also be taken out, here is what the bottom looks like when they are removed:


Here is the top inside lid:


I also made this tag that can be attached to the top of the box if given as a gift:


I used lots of delicious goodies from the Creating with Details Store, including:


The rest of the items seen are from my personal stash.  I hope you like what I did with this Tim Holz configuration box, please leave me a comment and thanks for stopping by!

Your Creating With Details Designer,
Kim Norman

Tuesday, November 18, 2014

Creative Color Challenge #24

Hi bloggers and crafty friends!  I have another card I created for the Creative Color Challenge to share with you today.  These color challenges are great in that they open me up to working with colors that I wouldn't ordinarily choose and I end up overcoming my apprehension in creating outside of my comfort zone.  I know it is a busy time with the holidays quickly approaching, but I would love if you played along with me, you can check the challenge out here:  Creative Colors Challenge

Here is the inspiration photo for this challenge:


We had to use 4 color sachets plus use a small envelope.
Here is my card:


I used this gorgeous digi image of roses provided by the sponsor of this challenge, 


I started with layers of peach, metallic green, and green and white print card stock.
I used a peach trim of small circles around all four corners of the card.
I added the image of the roses (which was colored using colored pencils) with double foam tape for dimension.
then I added two layers of lave trim to the bottom of the card, the first layer I hit with a spray from Lindy's.  I attached a white lace applique, peach lace collar (that I cut in half) and then the white roses and peach flowers from
The Secret Garden.  I added some pearl bling, peach ribbon, white lace and a vellum mini envelope (ink distressed) behind the image.

I hope you all like what I came up with for this challenge!  Please leave me a comment and thanks so much for stopping by!