09 10 expr:class='"loading" + data:blog.mobileClass'>

Search This Blog

Showing posts with label altered items. Show all posts

Saturday, March 9, 2019

Hippity Hoppity Easter's On It's Way!

Hello everyone, I am. here today for ScraPerfect to share a home decor project that is great for Easter or Spring.  I love home decorating for the holiday and found a frame on clearance to alter and I love the way it turned out, thanks to the amazing products from ScraPerfect.  Here is what I created, I hope you like it:


To begin. I measured and cut the cream crochet ribbon and ivory sequin trim and set them aside.  Then I applied small dots of the Best Glue Ever along the turret on the perimeter of my mint green photo frame.  I applied the crochet ribbon while applying gentle pressure and repeated the process with the sequin trim.  I took the back of my frame off  and attached ivory organza to the inside with the Best Glue Ever.  I made medium sized glue dots  from the Best Glue Ever and used them to secure the tea dyed doily to the organza.  This was also done with the rusty overalls, which I swiped with a beige ink pad to give a distressed feel. Whenever I am working with the Best Glue Ever, I keep a small No Clog Writing Cap on my bottle for precision and to reduce the amount used since a little goes a long way!


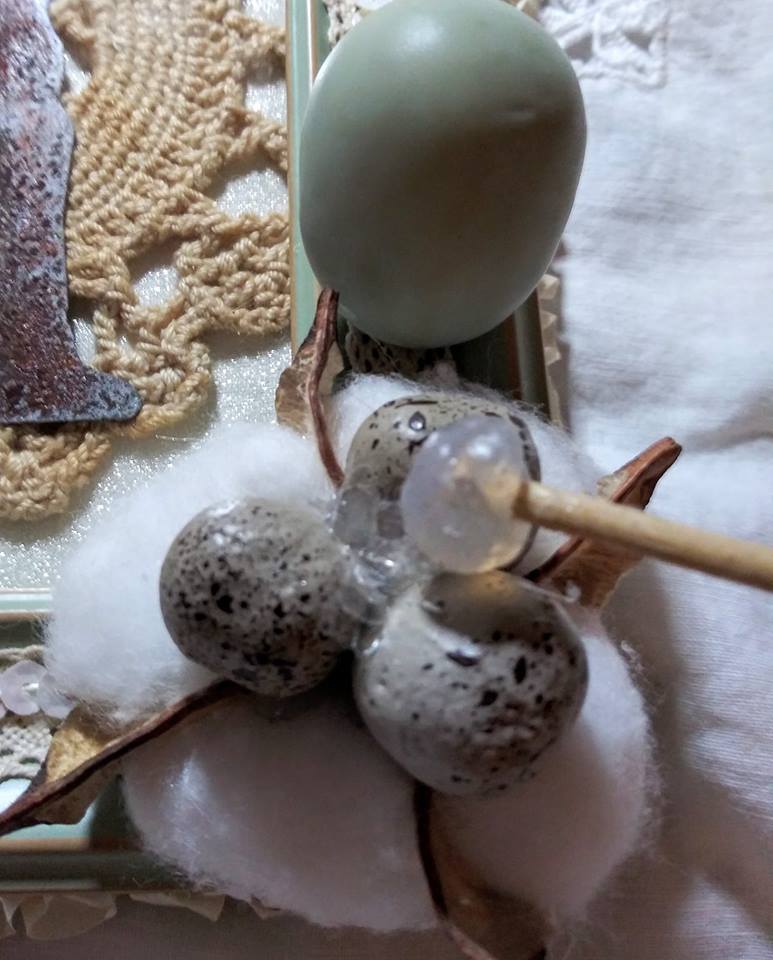
Now it is time to embellish my project.  I used the Best Glue Ever to attach the mint green metal clip to my frame.  It holds my hanging rabbit resin embellishment that I also added a small ivory gross grain bow to.  On the opposite corner, I used  large glue dots of the Best Glue Ever to secure the white cotton bud and small grey speckled eggs on top to my project.  I also attached the large green egg this way.  Then I got out my Embellie Gellie to add some mica flakes in the middle of my small egg trio, as well as on the clip on the top of my frame.


Thank you all for stopping by today to check out my home decor piece, I had fun making it and can't wait to display it for Easter.  Please be sure to follow ScraPerfect on social media and stop by the store website to purchase your supplies too, you won't be sorry!  If you would like to see more of my work, you can subscribe to my blog, Vintage Rose Creations by Kim.

Until Next Time,

Kim Lippincott

Saturday, January 19, 2019

In My Heart: An Altered Mini Folio for Valentine:s Day

Hello everyone, Kim. here today to share a fun project with your for Valentine's Day featuring some of the products from ScraPerfect.  My concept was to create something pretty to hold a love letter written for your sweetie on the day that celebrates love.  Here is what I came up with:


I started by cutting down a printed folder and used the Best Glue Ever to adhere all of my embellishments to the folio.  It worked well on the ribbon, metal bow, and white dangle lace.
I always have a No Clog Writing Cap on my glue for extra precision.  A little goes a long way and I suggest making small dots and waiting about 5 minutes until they turn clear before adding your embellishment.  I also added a chipboard quote to the top of my folio, some bling,  and a charm.  I added a fabric button to the center of my metal bow as well.  I felt that this folio would be perfect to hold a love letter that you write for that special someone on Valentine's Day!


As always, when finishing a project, I give my hands a couple of squirts of the Best Cleaner Ever to get any mess off quickly.  It's non toxic and works on anything you can think of!


Thank you all for stopping by today to check out my mini folio called In My Heart.  Please be sure to go visit ScraPerfect to get your own products for your craft desk.  Subscribe to the blog too while you are there please.  To see more of my work, my blog is Vintage Rose Creations by Kim.  I hope you will try a mini folio and write your sweetheart a love letter to go in it for Valentine's Day too!

Until Next Time,

Kim Lippincott

Wednesday, December 19, 2018

Fun and Easy Rustic Holiday Decor!

Happy Holidays everyone, I am here today to share a fun and cost effective holiday decor piece.  I went to the Dollar Tree recently and found these super cute signs and just had to alter them with some products from ScraPerfect.  The rustic country trend is following us into holiday decor this year and I for one am happy about that!  Hope you like what I created:


I began by pulling some potential goodies from my stash to add to my sign and then got out the Best Glue Ever since I knew it would adhere anything I needed to the wood sign.  Red Chinese braided trim was added all around the perimeter of the sign.  Makes it pop, don't you agree?  Then I began applying tiny dots of the Best Glue Ever for some embellishments. When using the Best Glue Ever, you should really have a 
No Clog Writing Cap on the bottle for additional precision and to make your bottle last longer.


I chose some pearls, so I grabbed my Embellie Gellie to insure perfect placement in the center of the snowflakes.  There is no other way to do this without turning your hands into a sticky mess.  This is a must have for any crafter that works with tiny elements in their art.


As you can see, I also added a trio of pearls on the center where the two edges of trim meet.  Ivory crocheted lace was also applied to the perimeter of the sign with the Best Glue Ever for added interest.
I really liked that this sign already had sparkle so I didn't have to add any.  These signs add cheer to any home during the holiday season and would make great gifts as well!  Once my project was complete,
 I squirted some Best Cleaner Ever on my hands and rubbed them with the Perfect Cleaning Cloth and my hands were spotless in two minutes.  Here is a look at my finished altered holiday sign:


I hope you like my quick and easy home decor piece and will come back in the New Year to see what I make then.  Kindly follow the blog, order your supplies today, check out all social media, and come back for updates and inspiration from ScraPerfect!  I would really appreciate it if you would follow this blog and leave me a comment, thanks again!

Holiday Blessings,

Kim Lippincott

Friday, November 3, 2017

Quick and Easy Altered Vintage Spoon Featuring the Best Glue Ever

Hello everyone! I am here today to share another project made simple with the Best Glue Ever from ScraPerfect.  I recently went to a Vintage Market Fair and found some vintage cutlery to play with. Check out this gorgeous spoon I altered:


This is what it looked like before I started:


  I started by taking some Prima paper and fussy cutting some roses.  I applied some of the Best Glue Ever, using a bit more than I thought needed, since it had to bond to metal.  I then waited until the glue was clear before attaching to the spoon, about 5 minutes.


I wanted this to have a winter feel, so I brushed on some Best Glue Ever instead of a decoupage medium, then added my homemade snow mix (snow and lots of glitter).


Then, I started embellishing with flowers, Dew Drops, and tiny rhinestone bling. I was able to place these with ease using Embellie Gellie. I also used a medium sized glue dot made from the Best Glue Ever to attach pink and white seam binding to the underside of the spoon.


I also embellished the pink paper roses by adding small dots of  the Best Glue Ever on them and then sprinkling them with some snow/glitter mix. As you can see, I always use a No Clog Writing Cap on my bottle of glue...it's amazing!  It ensures precise glue placement and prevents me from using more than needed. I also used the adhesive to attach a piece of pink micro pom pom trim around the round part of the spoon.  My final touch was to rub some Metallic Lustre in Rose Gold on the stem of the spoon for more color.  As always, I used a spritz of the Best Cleaner Ever on my hands to make cleaning a breeze!


I plan to also use the Best Glue Ever to attach the tab from a soda can to the back of the stem of the spoon so I can hang it up.  I hope you like how it turned out!  This was truly a project made fast and easily with ScraPerfect!


Thanks so much for stopping by today, please check back again for daily inspiration.  Also, be sure to go to ScraPerfect and order your supplies to help you craft faster and easier!  Please subscribe to this blog and feel free to leave a comment.

Until Next Time,

Kim Lippincott


Friday, October 20, 2017

Purple Masqerade

Hi there!  Kim here today to share another fun mask that I created with the awesome products from
ScraPerfect.  I had so much fun designing my last mask that I did another one to go in my craft room, so it is purple.  I hope you like what I did with this mask, here it is:


I started with a plain white plastic mask and painted it a pale lavender.  I added a layer of purple interference from Deco Art to give it the shimmer you see.  I then hit it with a Lindy's spray in a darker purple shade for some texture.  I glued a purple lace to the bottom of the mask on the back to hang down, followed by a string of purple gems all the way around the edge of the mask.  I used some flatback pearl trim and foil to accent the eyes of the mask as well. I added a couple of large rhinestone gems to the side of each eye and the middle of the dark purple rosette on the side as embellishment.  I used white and lavender ribbons to make a double bow and placed the dark purple rosette with the rhinestone in the center of it. White feathers were glued to the top of the bow in the back and a couple smaller feathers added to the bottom of the bow.  Dangling below the bow are pieces of eyelash trim, seam binding, ribbon, lace, more purple gems and 2 dark purple tassels. For added interest, I added some Dew Drops from The Robin's Nest to the tails of some of these.

This is going to hang proudly in my purple and Parisian themed  craft room.  Here are the products from ScraPerfect that I used in this project:


Thank for so much for stopping by today, please be sure to subscribe to this blog and leave a comment.


Crafty Blessings,
Kim 


Stunning Shabby Chic Mask

Hello everyone, Kim back again today to share another project I created with amazing products from
ScraPerfect. I decided to challenge myself to find as many different items to test with the Best Glue Ever, and this glue really was the star of this project!  I took a white, thin, plastic mask that I got on clearance at my local craft store and as many things I could find and started gluing.  This is what I ended up with:


I turned this simple mask into an ivory and white,  shabby chic treasure, I love the way it came out!  Normally, I would have had to use a few different types of glue to adhere all of these materials, but the Best Glue Ever with the No Clog Writing Cap proved their worth!  This duo is a must have for every crafter, especially since they will last forever.  The only thing I did with the BGE was to make glue dots (medium size) for heavier items and only used a fine line for the lighter items.  Either way, I waited a few minutes before placing the item down.  Here are some close up photos of my mask so you can see the various weights and textures that I used on it.


You can see that I used the Best Glue Ever on: laces, a piece of a collar, pearl trim, braided trim, marabou feather trim, ivory peacock feathers, seam binding, and a rosette with a tiny pearls in the center. The
Best Glue Ever was able to handle all these materials and everything is on my mask very sturdy.


I had to use this piece of vintage gold and rhinestone bling on this project, don't you love it?  I made a few small glue dots from the Best Glue Ever and placed them on the back of the bling piece and they worked like a charm!  I also used the glue dots to secure each individual ivory peacock feather and string of pearls or seam binding.

I urge you to give this awesome product, the Best Glue Ever, a test for yourself...you won't be sorry.  And remember, it's not just for paper crafting.  So get your masks out, gather all of your trims and bling and try one of these too!  Here's a final look at my mask:


Thank you so much for stopping by today, please take a moment to subscribe to this blog and leave a comment.

Happy Crafting,
Kim 


Shabby Pink Ballerina Gift Box

Hi there!  I am  here today to share with you another upcycle using the fabulous products from ScraPerfect.  I have so many of these boxes from a monthly subscription and I don't want to waste them.  I decided to upcycle them and use them instead of gift bags.  Hope you like my project:


I began by decoupaging some paper from Scrapberry onto the box using my favorite type of Mod Podge...sparkle! I love the effect the glitter gives on feminine and shabby chic themed projects!


To provide some detail on the sides of the top of the box I adhered ivory flatback pearls and pink pom pom trim with the Best Glue Ever.  To keep my bottle in good working condition, I recommend using the No Clog Writing Cap.  It prevents clogging and protects the tip to ensure your ability to use a thin line of glue.  


This ballerina has been in my stash for ages, so I just had to add it to this project.  Her tutu was blue, so I just added pink stickles to it.  I also added a tiny rhinestone to her tiara with a tiny dot of the Best Glue Ever.  I placed the rhinestone with Embellie Gellie, the quick pick up tool.  The ballerina is surrounded by pink resin roses, which were also adhered to the box with glue dots made from the Best Glue Ever.


For the tails that hang down off of the box, I raided my snippets basket for some small pieces of lace, then added pink and white seam binding and a pink tassel.  Each piece was secured to the top of the box with glue dots made from the Best Glue Ever.  I find that the glue dots work better with heavier items like lace and can be made the exact size needed.


Finally, I attached some ivory flatback pearls all the way around the bottom of the box with a thin line of the
Best Glue Ever for added interest. You can also see that I went around the lip of the lid with a white organza trim and a pink pom pom trim from my stash.  These were light enough that I could use 2 thin lines of the
Best Glue Ever to secure them.  As always, when I finish a project, I use of couple of squirts of the
Best Cleaner Ever on my hands as it is non-toxic and I am good to go!

I hope this upcycle inspires you to try one.  I think anyone would love to get a gift in a decorated box that can be used later for storage.  So get some of the extra boxes you have and the products I mentioned above from ScraPerfect and get crafty.

Thanks for stopping by today, please leave a comment and be sure to subscribe to this blog.  I will be back with another creation tomorrow, so please check back.


Kim 


Tuesday, May 9, 2017

Shabby Series- Altered Plate #3 Aqua "Unique and Special You"

Hello everyone, I am  here today to share my final altered paper mache plate in the series, I hope you have enjoyed them!  I have had so much fun shabbying them up and using ScraPerfect products.  This plate is a pretty shade of aqua and would make a great gift for someone special.  Here it is:


For this plate, I covered it with a coat of white gesso and then painted it with aqua chalk paint.  I then used a gray antiquing paint over the whole plate and removed the majority of it with a baby wipe while it was damp.  I then dry brushed some white paint to complete the antique look.  I got to work then tearing paper into pieces that I decoupaged collage style on the plate.  While it was still wet, I sprinkled mica flakes on the plate to give a shimmery effect.


For interest in the center of the plate, I decoupaged a white crocheted doilie.  I used the amazing
Best Glue Ever to adhere the metal embellishment to the middle of the doilie.  I then ran tiny beads of
Best Glue Ever around the middle edge of the plate and used it to adhere the rhinestone trim to for sparkle.
I also used the Best Glue Ever to glue the aqua organza ruffle trim around the back of the plate for a soft feel.


I also placed 2 pieces of paper in either corner of the plate which reads, "unique and special you".  I chose to add that since this will be a gift for someone special.


For this plate, rather than display it on a stand, I recycled a clear plastic hanger off the packaging of something else and attached it to the back of the plate with the Best Glue Ever as was suggested in a comment from a previous post.  It worked like a charm!


  As always, I finish with clean up, which includes a spritz or two of Best Cleaner Ever on my hands and my work area to take off any excess glue.  Here is another look at the finished plate:


Thank you for taking the time to follow my series of altered paper mache shabby chic plates!  Please leave a comment on this post and stop by ScraPerfect for information about all of the fabulous products, videos, the newsletter, and everything else you want to know.  To see more of my work, please check out my blog, 
Vintage Rose Creations by Kim.  I will be back at the end of the month with a vintage themed scrapbook layout, so please check back!

Until Then,

Kim 

Special Shabby Series- Altered Plate #2 "Blue China"

Hi everyone, I am here today to share with you the second altered paper mache plate of my series.  This one is shabby chic too, but incorporates a different color palette.  The inspiration for this project is my beloved Grandmother's antique dishes.  I will be displaying it proudly in her honor, I hope you like it.


I started by decoupaging the napkin onto the paper mache plate.  I then brushed some crackle medium over the entire plate and waited for 24 hours for it to cure.  This was to give it a bit of an antique feel.  Then I got out my Best Glue Ever and went to town!  First, I put glue dots on the back of the satin rose applique and waited until the glue was clear to attach it to the plate. I used the Best Glue Ever the same way to adhere the blue gimp trim around the plate, the white bow lace trim, and the sheer organdy trim around the outer edge.
I used a large dot of the Best Glue Ever in the center of the plate and when clear attached the blue acrylic flowers to the plate.  I used the same method to attach the large pearl flower.


Now I got out the pest pick up tool in the world, Embellie Gellie, and using the tiniest of glue gots, attached the micro pearls to the bow centers of the lace.  As always, when cleaning up, I used a few spritzes of the
Best Cleaner Ever on the Perfect Cleaning Cloth to get my hands clean in a flash.


I hope you are enjoying this series, I have one more plate to share with you soon and this one will have a hook on the back to hang on the wall.  Thank you for stopping by today and please leave a comment.  Be sure to check out the amazing products I've mentioned and the rest of the family at ScraPerfect.  If you would like to see more of my work, check out my blog Vintage Rose Creations by Kim.  Again, here is a look at the final project, enjoy!


Until Next Time,

Kim